Hello Woodworking Enthusiasts!
I’m Thomas, a passionate carpenter, and today I’m excited to dive into the world of shellac! That magical moment when your woodworking project truly comes to life is right around the corner. You’re at that thrilling point where every brushstroke reveals your vision more vividly. Let’s explore how many layers of shellac are ideal to make your creation shine!
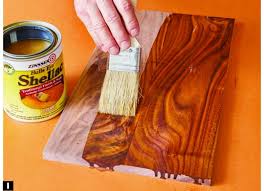
To achieve a top-notch finish, consider applying 3-4 layers of shellac. The first layer acts as a seal, the second brings out the stain, and layers three and four ramp up the durability. Use a brush for precision on edges and a cotton rag for broader strokes on larger surfaces. Shellac not only seals but also gifts your wood with a splendid color palette.
Now, let’s get to know our star: Shellac. It’s more than just a finish; it’s a way to enhance your wood’s natural beauty with a touch of color and robust protection. However, keep in mind that shellac isn’t the Hercules of finishes; it’s not as resistant to elements and wear and tear compared to others. But, its charm lies in its ability to highlight wood’s natural grace without overwhelming it. It’s perfect for indoor pieces that don’t face the harshness of the outdoors.
Wondering about shellac’s role? Here’s the scoop: the initial layer fills in any imperfections, while the second layer preps it for sanding and provides mild protection. We recommend 3-4 layers for that perfect blend of aesthetics and safeguarding. And here’s a pro tip: shellac dries quickly, so work in small sections for a smooth, even coat.
If you’re pondering over the sanding process, let’s clear the air. Generally, you can hold off sanding until after the second layer. Aim for even application to minimize sanding needs. When it’s time, go for gentle, fine sandpaper, and don’t forget to feather out those brush strokes to avoid pesky ridges.
Reached the final layer of shellac? Congrats! Sanding here is optional and more about aesthetics. For a grand finale, consider sealing the deal with a non-silicone wax. It adds durability and enhances the visual appeal, making your piece truly stand out.
Accidents happen, and your shellac finish might need a touch-up. Don’t fret; it’s simpler than you think. Use straight alcohol to erase the damage and reapply shellac carefully. Remember, keeping track of the shellac brand used initially can be a lifesaver for seamless touch-ups.
| Aspect | Details |
|---|---|
| Number of Layers | 3-4 |
| Application Tools | Brush for edges, cotton rag for larger surfaces |
| Shellac Characteristics | Enhances wood’s natural pattern, not highly resistant to elements |
| Sanding Between Coats | Optional, recommended after 2nd layer |
| Final Coat Sanding | Optional, based on desired aesthetics |
| Repairing Shellac | Use alcohol to remove damaged shellac and reapply |